Why use the Prospecting Agent?
Finding the right companies to reach out to is one thing. Getting them into your workflow with enough context to actually call — that's another. The Prospecting Agent bridges that gap.
You tell the agent which segment to prospect from, how many companies you want per day, and where to put the results. It evaluates companies against your ICP, sorts them by Goava Score, and delivers qualified prospects to a list of your choice — automatically. Companies that don't make the cut get placed in a separate list so you can review them later or ignore them entirely.
How this changes your team's workflow:
- Morning prospecting sessions disappear. Instead of reps starting the day by hunting for companies, the positive list is already stocked with qualified prospects when they arrive.
- Quality stays high. Because the agent scores against your ICP and separates good from bad, your reps only work companies that actually fit your target profile.
- Pipeline stays full automatically. Set the agent to deliver new prospects daily and your team always has fresh companies to work — without anyone having to remember to prospect.
- Your CRM stays in sync. If your CRM is connected, the qualified companies can flow directly into your CRM pipeline. Combine with Research Agent Automations and each company arrives with contacts and a research note already attached.
How to set up the Prospecting Agent
You'll find the Prospecting Agent in your Discover settings. You can create multiple agents — for example, one per segment.
Creating a new agent
Click Add a new agent to get started, then configure each field:
- ICP: Select which ICP profile the agent should use for scoring. Goava Score sorting is based on the ICP you choose here, so the agent will prioritize companies that best match that profile.
- Segment: Choose which segment the agent should prospect from. This defines the pool of companies the agent evaluates. Make sure your segment reflects your target market — the tighter and more relevant the segment, the better the results.
- Positive outcome: Choose the list where good prospects should land. When the agent finds a company that qualifies, it gets added to this list. This is where your reps will go to find new companies to work.
If your CRM is connected to Goava, companies added to the Qualified will be exported to your CRM — along with any Research Agent notes if you have automations set up. - Negative outcome: Choose the list where rejected prospects should land. Companies that the agent evaluates but doesn't consider a good fit are placed here. This keeps your positive list clean and gives you transparency into what was reviewed.
- AI credit budget: Set the maximum number of AI credits the agent can spend per prospect or per day/month/week. AI credits are used during the company analysis — even for companies that don't qualify. The max limit controls how much can be spent per company before the agent pauses.
For example, setting this to 10 credits per day means the agent will stop working once the budget has been reached. The day after, it will start again with the same budget. - Triggered by signal or schedule: Choose if you want the agent to act on signals or run on a schedule.
If you select schedule, it will run in your selected segment every night and qualify a set number of prospects based on your selected ICP. This is best for a predictable number of prospects per day.
If you select signals, it will monitor your news and recruitments in your selected segment and evaluate the companies with relevant signals continuously throughout the day. The number of prospects/signals you'll get is controlled by your AI credit budget. Starting with 10 credits/day, which will give you about 5 qualified prospects/signals per day, assuming that there have been at least 5 signals that fit your profile in your segment.
If you select triggered by schedule:
Prospects to find: Set how many qualified prospects you want the agent to find, and how often. For example, 3 prospects per day or 5 prospects per week. Start with a lower number to review quality before scaling up.
If you select triggered by signals:
Your instructions: You can give specific instructions to the agent about what type of signals you're interested in. For example, "I'm interested in Sales and growth-related signals".
You can also leave it blank, and this will default to the signal profile that we have built for you based on the products/offering you have, the stakeholders you sell to and the type of companies you sell to.
Activating and managing your agent
- Use the Active/Inactive toggle to start or pause the agent.
- Click Save to save your configuration, or Update to save changes to an existing agent.
- Click Ta bort agent (Remove agent) to delete an agent entirely.
You can create multiple agents by clicking "Add new agent" again — useful if you work with several segments or ICPs.
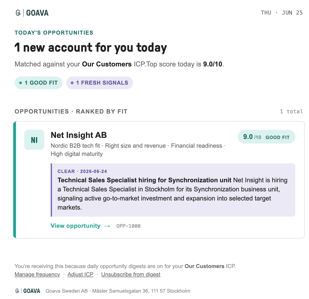
What the results look like
You will also get a daily email digest at 8:00 in the morning with a summary of your agents' findings.
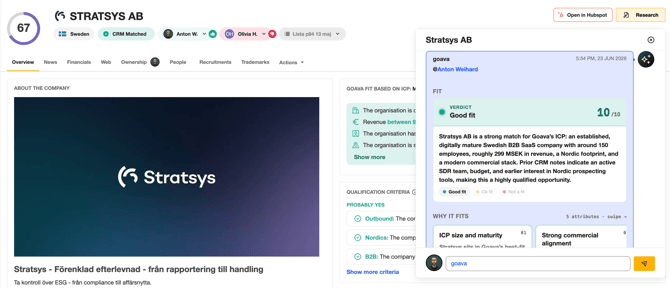
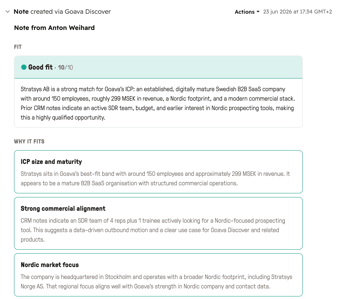
Example of research sent to the CRM:
Tips for getting the most out of the Prospecting Agent
- Start with a focused segment. A narrow, high-quality segment produces better leads than a broad one. If your segment has thousands of companies, tighten the filters (industry, employee count, geography, Goava Score) so the agent focuses on the most relevant ones first. Select your ICP carefully, as that alsogreatly effects your output.
- Review the first batch carefully. After the agent has been running for a few days, check both the positive and negative lists. Are the right companies landing in the right place? If not, adjust your segment filters, ICP selection, or credit budget.
- Use multiple agents for different targets. If your team sells to different segments or has different ICPs, create separate agents for each. This keeps the prospecting focused and the results clean.
- Combine with Research Agent Automations. Set up a Research Agent Automation on your positive result list. That way, every company the Prospecting Agent qualifies also gets an automatic research brief — so when a rep picks up the company, the context is already there.
- Start with a conservative credit budget. If you're unsure about the right credit level, start with a lower max and increase it based on the quality you're seeing. You can always adjust later.
Need help?
If you have questions about the Prospecting Agent or need help configuring it for your team, reach out to us via the Support chat in the bottom right corner of the screen, or contact your Customer Success Manager.