Go to the installation URL.
Select the user group for installation and complete the installation flow.
Go to Setup > Apps > Connected Apps > Manage Connected Apps and click the Goava Enrich link.
Click on the Edit Policies button on this page.
Change "Permitted Users" under "OAuth Policies" to "Admin approved users are pre-authorized" and save.
In the Connected App Details page select Profiles who will have access to the app using the Manage Profiles button under the Profiles section.
Go to User Interface > Lightning App Builder and create/edit the default account page.
Drag a Visualforce component to the place where you want to show the Goava Enrich widget.
In the component settings section select "Goava Enrich Data" for the Visualforce Page Name dropdown. You should see the new component populated with data. We recommend a height of around 500-500px to be able to show all the data without scrolling.
Save the page and visit an account/company page to verify the component is working.
If you are an Enrich premium customer you will need to do some additional configurations.
Looking to populate your own data fields and keeping them updated? Then you want Enrich Premium for Salesforce.
With Enrich premium for Salesforce, you can update all your accounts with up-to-date data in your fields to use them for building workflows, filtering, and analytics in Salesforce.
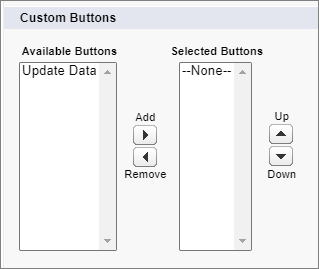
Bulk update all your accounts in Salesforce
Automatic daily updates of your accounts
Enrich accounts with a single click of the button